Tutorial: Christmas Picture Frame Ornament

Gisteren liet ik mijn swaps zien voor de Stampin' Up OnStage event in Amsterdam, vandaag heb ik een tutorial voor de Christmas Picture Frame Ornament.

Yesterday I showed my swaps for the Stampin' Up OnStage Event in Amsterdam and today I have a tutorial for the Christmas Picture Frame Ornament.
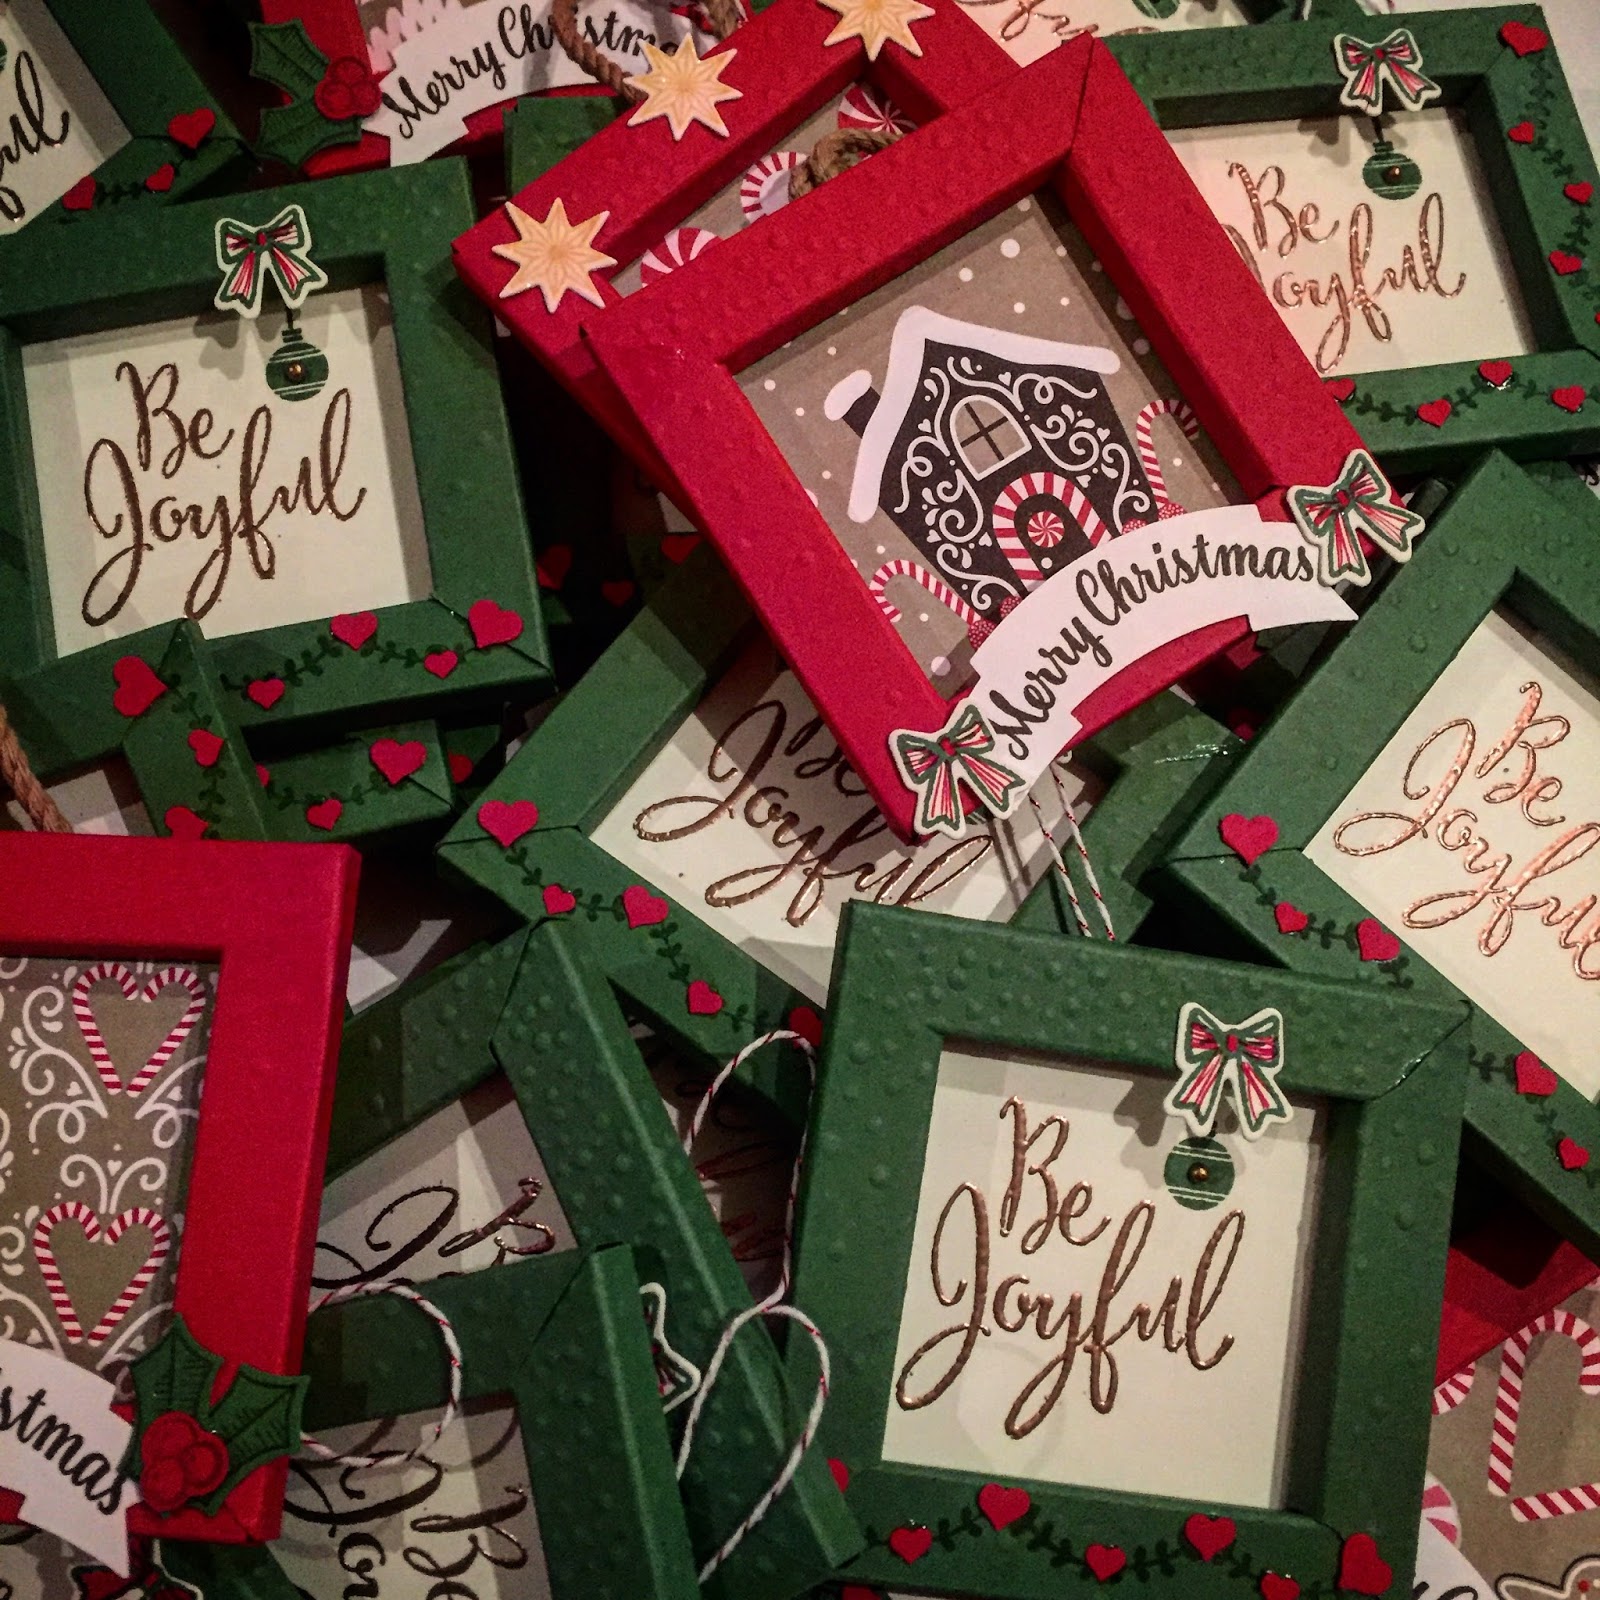
De Picture Frames zijn gemaakt in de kleuren Garden Green en Real Red.


Dit was het eerste ontwerp, maar het was toch niet helemaal wat ik wilde. Ik vind de stempel van Maria, Jozef en baby Jezus helemaal geweldig, dus ik ga zeker nog wel iets in deze trant maken voor de kerstmis.

This was the first design for the swaps, but it wasn't what I was looking for. I really like the stamp with the holy family so I certainly will make an other attempt for a little frame with this stamp before Christmas.

Maar nu eerst: de tutorial!

But for now: the tutorial!


1. Cut a piece of  6"x 6" cardstock in the desired color.

2. Run the cardstock trough the BigShot with the Softly Falling Embossing Folder.


3. Score the Cardstock on both sides at: 1/2" - 3/4"- 1 1/4" - 1 1/2" - 4 1/2" - 4 3/4" - 5 1/4" - 5 1/2"


4. Stamp a decorative bow in garden green with the little garland from the stamp set Christmas Pines.


5. Cut according to the picture below.


I forgot to take a picture with the little gaps in the sides! Oops!


So please, take a good look at the scetch I draw and cut out the little gaps at the arrows!


6. Stamp with Versamark the Be joyful-sentiment from the stamp set Merriest Wishes and emboss it with Copper.


7. Stamp a little Christmas Bulb from the Hostess set Cozy Critters in Garden Green and embellish with a little metallic enamel shape.


8. Glue the Very Vanille cardstock in the middle of the Garden Green. Fold on the score lines, slit the sides into each other and glue it together. I put a little double sided tape on the bottom on the frame and glued the corner close with the fine tip glue pen.

9. Embellish the frame with a little bow from the bundle Santa's Sleigh. I stamped the bow in Garden Green and with a Real Red Stampin' Marker I draw some lines (to create a candy cane-like effect).

10. Punch out some hearts in Real Red cardstock with the hearts border punch and glue them with the fine tip glue pen on the border on the bottom of the frame.

11. Get some baker's twine and make a little bow to hang the ornament in the tree. Attach the twine on the back with a little glue dot.


For the Real Red frames you can follow the instructions 1 - 5 . Don't stamp the little garland!!!

12. For the inside of the picture frame cut a 2 1/2" x 2 1/2" piece of Candy Cane Lane DSP. (I really love those little gingerbread houses!!!). Glue the dsp in the middel of the Real Red frame.


13.  Stamp with Early Espresso the Merry Christmas sentiment form the stamp set Star of Light. The fun thing with photopolymere is that you can bend it into the shape you need. 

14. Punch the Merry Christmas sentiment with the duet banner punch and glue it on the bottom of the frame.

15. Stamp the holly leaves (Garden Green cardstock and ink) and berries(Real Red cardstock and ink) with the Holly Berry Happiness Stamp Set and the Holly Berry Builder Punch and glue them next to the little banner.

16. You can stamp a little star in Crushed Curry from the stamp set Star of Light, use the thinlits and the BigShot to make a nice little star. You can use the star for further embellishment.

17. Cut a little Kraft Rope Trim to create a loop on the back so you can hang the little picture frame in the Christmas tree.


If you have any questions, please let me know!


Onstage Amsterdam 2016

Vandaag ben ik naar OnStage Amsterdam geweest. Het was weer superleuk om allemaal bekenden te zien en te spreken en natuurlijk om mee te swappen! Ik had kleine schilderijtjes gemaakt om bijvoorbeeld in de kerstboom te hangen.


Natuurlijk kregen we ook de nieuwe spring/summer-catalogus voor 2017. En daar staan weer geweldige nieuwe hebbedingen in! Er werden ook veel voorbeelden gemaakt en getoond waarbij de nieuwe producten gebruikt worden. Volgende week kan ik de gemaakte kaarten laten zien en ook enkele stempelsets, die ik heb gekregen.

Het was weer een SUper dag!

Eveline

Stitched from the Heart


Zijn ze niet geweldig, deze nieuwe framelits? Ik kan niet wachten om er mee aan de slag te gaan!
Als jij ze ook wilt of er mee wilt werken tijdens een workshop, neem dan contact met mij op.

Groetjes,

Eveline

I Stamped This!


Stampin' Up! Heeft weer een leuke nieuwe set bedacht om jouw kaarten nog meer eigen te maken.
Ik vind hem leuk!

Groetjes,

Eveline

Weekly Deals

Built for Free Using: My Stampin Blog


Als je iets wilt bestellen, stuur me dan een berichtje.

Have Fun & Enjoy!

Eveline

Dikkie Dik Taart


Deze taart heb ik gemaakt voor de zoon van vrienden van mij. Dit is al een beetje traditie aan het worden. Vorig jaar heb ik een Teletubbietaart gemaakt en het jaar daarvoor een apentaart. Dit jaar moest het een Dikkie Dik Taart worden en dit is het resultaat.


Ik begon met het bakken van twee cakes, die ik door midden sneed, waarna ik op beide helften aardbeienjam smeerde en gele room.


Daarna de lagen op elkaar gelegd en witte chocoladepasta een paar seconden in de magnetron gezet om makkelijker uit te kunnen smeren.


Nadat ik de kleine en de grote cake had afgesmeerd met witte chocoladepasta, werd de taart bekleed met witte en blauwe rolfondant in de kleuren van Het Dikke Verjaardagsboek van Dikkie Dik.


Nadat de taart bekleed was met het rolfondant, heb ik hem verder versierd met gekleurde rondjes, confetti. Helaas had ik geen eetbare glitter, anders had ik de confetti net zo laten glitteren als op het boek.


Dikkie Dik heb ik gemaakt van marsepein. De rode strepen en de zwarte accenten heb ik gemaakt met glazuurstiften.


Ik was redelijk tevreden met het resultaat, maar er zaten helaas wat schoonheidsfoutjes in de taart. Binnenkort maar een cursus volgen, zodat ik volgend jaar een perfecte taart kan afleveren. Ik ben benieuwd welk thema het dan wordt!

Have Fun & Enjoy!

Eveline

Clear Block Techniek


Voor deze kaarten heb ik de clearblok-techniek gebruikt. Ik heb met een Stampin' Pad 3 kleuren op het blok aangebracht. De kaart had ik afgeplakt met schilderstape, zodat er alleen binnen het kader kleur zou komen. Ik had de Stampin' Pierce Mat onder mijn papier gelegd, zodat er meer contact was tussen papier en clearblok.

For these cards I used the clear block technique. With Stampin' Pads I gave the clear block 3 colors/ The card was masked with tape to avoid inking the outside of the card. I only wanted the inside of the masked stamped with the clear block. I used the Stampin' Pierce Mat underneath my paper to have more contact between paper and clear block.

Stampin' Up: Flowering Flourishes, Express Yourself;
Archival Jet Black, Marina Mist, Smoky Slate, Whisper White, Wisteria Wonder

Stampin' Up: Sheltering Tree; 
Blushing Bride, Early Espresso, Garden Green, Pear Pizzazz,
Smoky Slate, Whisper White, Wisteria Wonder

Have Fun & Enjoy!

Eveline

File Tabs Edgelits Cards


De file tabs edgelits dies gebruik ik heel erg weinig, terwijl ik wel heel erg enthousiast was, toen ik ze kocht. Dus toen ik een kaart op Pinterest zag, waarbij deze dies gebruikt waren, heb ik ze maar eens tevoorschijn gehaald en ben ik er mee aan de gang gegaan. Ik ben tevreden met het resultaat. Ik ben benieuwd wat jullie er van vinden..

The file tabs edgelits dies aren't used very much by me, while I was very enthousiastic when I ordered them. So when I saw a card on Pinterest, that used these dies, I took them out of their hiding place and created a card with them. I'm pleased with the result. I wonder what your opinion is.


Stampin' Up: File Tas Edgelits Dies, Feathers Framelits Dies; Hearts Border Punch;
Let your hair down stampset, Four feathers stampset;
Crumbcake, Pink Pirouette, Pool Party, Whisper White. 


Stampin' Up: File Tas Edgelits Dies, Elegant Butterfly Punch
Stampset: Papillon Potpourri, Everyday Occasions Cardmaking Kit, Express Yourself 
Crumbcake, Pool Party, Watermelon Wonder, Whisper White. 

Stampin' Up: File Tas Edgelits Dies, Elegant Butterfly Punch
Stampset: Papillon Potpourri, Everyday Occasions Cardmaking Kit, Express Yourself 
Crumbcake, Pool Party, Watermelon Wonder, Whisper White. 


Have Fun & Enjoy!

Eveline


.

Sneakpeek: Mini treat Bag in new Stampin' Up Stamps & Colors

Stampin' Up: Mini Treat Bag Thinlits; Petite Petals Punch, Itty Bitty Accents Punch Pack;
Stampsets: Flowering Flourishes, You're So Sweet; Colors: Mint Macaron, Watermelon Wonder


Stampin' Up: Mini Treat Bag Thinlits; Petite Petals Punch, Itty Bitty Accents Punch Pack; 
Stampsets: Flowering Flourishes, Sprinkles of Life, You're So Sweet;
Colors: Mint Macaron, Watermelon Wonder, Whisper White, Blushing Bride, Baked Brown Sugar, Cucumber Crush

Have Fun & Enjoy!

Eveline

Stampin' Up Color Card Index


Nu de nieuwe In Colors van Stampin' Up zich bij mijn verzameling hebben gevoegd, had ik echt behoefte aan een overzicht. Eerst pakte ik altijd de catalogus erbij om te kijken welke kleur een stukje cardstock was of bij welke serie een kleur hoorde.

When I added the new Stampin' Up In Colors to my collection, I really needed an oversight. At first I always took the catalogue to look what color a piece of cardstock was or to which collection it belonged.


Dus ben ik heerlijk aan de slag gegaan met mijn stampin' pads, cardstock en mijn markers om een setje index-kaartjes te maken, zoals ik ook heb gemaakt voor mijn ponsen.

 So I took my stampin' pads, cardstock and markers and went to work. I made a set of index cards just like the one I made for my punches.


Voor mijn ponsen heb ik zwart cardstock, ATC-formaat, gebruikt en de naam van de pons op de kaartjes vermeld. De geponste kaartjes heb ik daarna in ATC-hoesjes gedaan, gaatje erin gemaakt met de crop-a-dile en aan een ring gedaan. Op deze manier kan ik makkelijk en snel zien of een stempel en een pons bij elkaar passen.

For my punches I used black cardstock, ATC-size, and added the name of the punch. The punched cards were put into ATC-sleeves, punched with the crop-a-dile and bind together with a ring. This way I can see at a glance if a stamp and a punch will fit together.


Voor mijn color-cardindex heb ik witte ATC-kaartjes gebruikt. Ik heb enkele lijnen getrokken op het kaartje, de naam van de kleur met de bijbehorende marker in een hokje geschreven, een hartje gestempeld in dezelde kleur en daarna een hartje geponst van hetzelfde cardstock en dat naast het gestempelde hartje geplakt.

For my color card index I used white ATC cards. I draw some lines on the card, wrote the name of the color with the fitting marker on the card, stamped a heart-shaped image in the same color above it and punched a heart from the same color cardstock and glued that beside the stamped image.


Nu heb ik twee kaart-indexen in een handzaam formaat op mijn bureau liggen en het is een stuk makkelijker in gebruik dan telkens de catalogus te pakken.

Now I have two card-indexes in a small format on my desk and it is way easier to use then grabbing my catalogue every time.


Dit is een overzicht van alle kaartjes, die ik heb gemaakt.
This is an overview from all of the cards, I've created.


Have Fun & Enjoy!
Eveline


Sneak Peek: Sprinkles of Life


Stampin' Up: Mini Treat Bag Thinlits, Chalk Talk Framelits; Tree Builder Punch, Confetti Stars Border Punch;
Stampset: Sprinkles of Life & You're so Sweet;
Colors: Marina Mist, Midnight Muse, Crushed Curry, Baked Brown Sugar, Strawberry Slush, Whisper White


Als je nieuwe stempels hebt, moet je ze natuurlijk ook gelijk proberen! Dan is het fijn, dat het vandaag moederdag is en daar hoort een kaartje bij. En dat kaartje was snel gemaakt met de nieuwe stempelset van Stampin' UP: Sprinkles of Life en You're so Sweet. Voor het labeltje heb ik met de wolkjes- en confetti-stempel een achtergrond gemaakt. De cupcake heb ik ingekleurd met een waterpenseel.
Mijn nieuwe favoriet is toch wel de hello-ster voor de treat bag.

When you've had new stamps, you have to try them immediately of course! Then it is a good thing, that today is mothers day and that calls for a card. And that little card was quikly made with the new stamps from Stampin' Up: Sprinkles of Life and You're so Sweet. The label is made with the little cloud- and confetti stamps to make a background. The cupcake is colored with a aqua painter.
My new favorite is the hello-star for the treat bag.


Stampin' Up: Chalk Talk Framelits; Tree Builder Punch; 
Stampset: Sprinkles of Life; 
Colors: Island Indigo, Baked Brown Sugar, Strawberry Slush, Whisper White

Have Fun & Enjoy!


Eveline

Confetti kaart


Vandaag een verjaardagskaart met een klein vellum envelopje gevuld met confetti. Op deze manier kan je echt alle restjes van je papier gebruiken met behulp van een perforator.
Het envelopje is gemaakt van een 3"x 3" papiertje en het envelop punchbord. 

Today a birthday card with a little vellum envelope filled with confetti. This way you can use every little bit of your beautiful papers with the help of a hole punch.
The little envelope is made from a 3"x 3" paper and the envelope punchboard.


Have Fun & Enjoy!
Eveline

Giftcard Envelop

Stampin' Up: DSP Best Year Ever; stampset: Making Spirits Bright, Amazing Birthday; Punches: Ticket, 2" circle, 1 3/4"scalloped circle, 1 1/4" circle punch; Colors: Calypso Coral, Coastal Cabana, Crushed Curry, Whisper White

Afgelopen maand had ik meerdere verjaardagen waarbij de jarigen graag geld of een giftcard wilden hebben. En het is zo saai om dat in een normale witte envelop te doen. Dus na even zoeken op Pinterest had ik weer voldoende inspiratie om dit envelopje te maken. Geld past erin en natuurlijk ook een cadeaukaart.

Last month I had several birthday party's and the birthday girls wanted money or a giftcard. And  it is so boring to give that kind of present in a plain white envelope. After a quick look on Pinterest I had enough inspiration to make this little envelope. Money fits in easily and of course a giftcard will also fit in.

Stampin' Up: DSP Best Year Ever; stampset: Amazing Birthday; Punches: 2" circle, 1 3/4"scalloped circle, 1 1/4" circle punch; Colors: Calypso Coral, Coastal Cabana, Crushed Curry, Whisper White


Have Fun & Enjoy!

Eveline

Pandataart


Naast de panda-traktaties voor zijn vriendjes op school kwam er natuurlijk ook een pandataart. Omdat ik niet van botercrème houd, heb ik de taart afgesmeerd met witte chocoladepasta. Gele room en aardbeienjam zat tussen de lagen van de taart. Een zeer geslaagde combinatie!
En bovenop de taart zat een panda van fondant.


Have Fun & Enjoy!
Eveline

LinkWithin

Related Posts Plugin for WordPress, Blogger...